In this article we are going to install
and configure virtual environment in order to use it with such
libraries like Selenium,
nosetests,
py.test and unittest.
So, to start development we need to
install Python, after that Python package manager or pip.
For Python we have an additional library which is useful for creating
isolated Python environments: virtualenv.
Installation:
C:\Python27\Scripts>pip
install -U virtualenv
Collecting
virtualenv
Downloading
virtualenv-13.1.2-py2.py3-none-any.whl (1.7MB)
100%
|################################| 1.7MB 170kB/s
Installing
collected packages: virtualenv
Successfully
installed virtualenv-13.1.2
C:\Python27\Scripts>
After installing the virtual
environment we should activate it and install Selenium WebDriver
along with the frameworks that are going to be used for test
development and execution. In my case it is unittest that
includes into Python by default, nosetest and py.test.
Now, it is time to configure the
environment.
First of all, we should create the
required environment for our tutorial:
C:\Users\Mikhail\Documents\Development\virtual_environments>C:\Python27\Scripts\virtualenv.exe
selenium_training
New
python executable in selenium_training\Scripts\python.exe
Installing
setuptools, pip, wheel...done.
C:\Users\Mikhail\Documents\Development\virtual_environments>
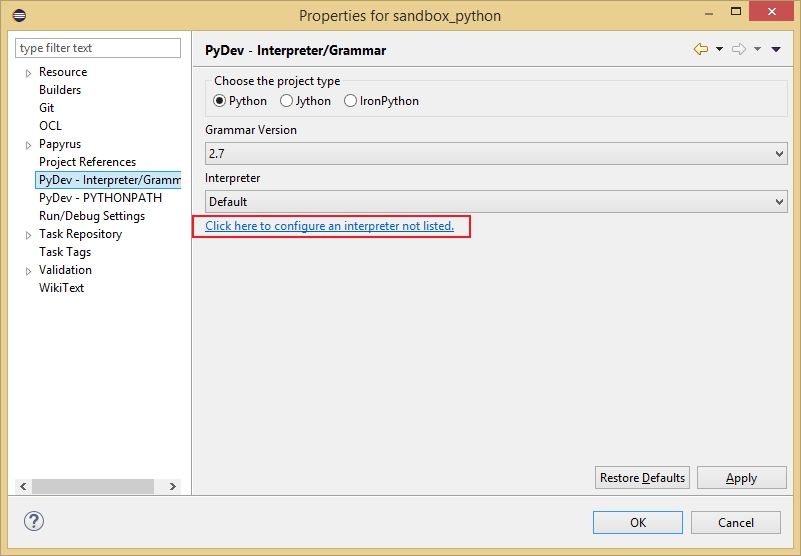
After that we should configure the new
environment in Eclipse. Since we already have the project, we should
go to the project's properties and click on the link 'Click here to
configure an interpreter not listed' like in the picture below.
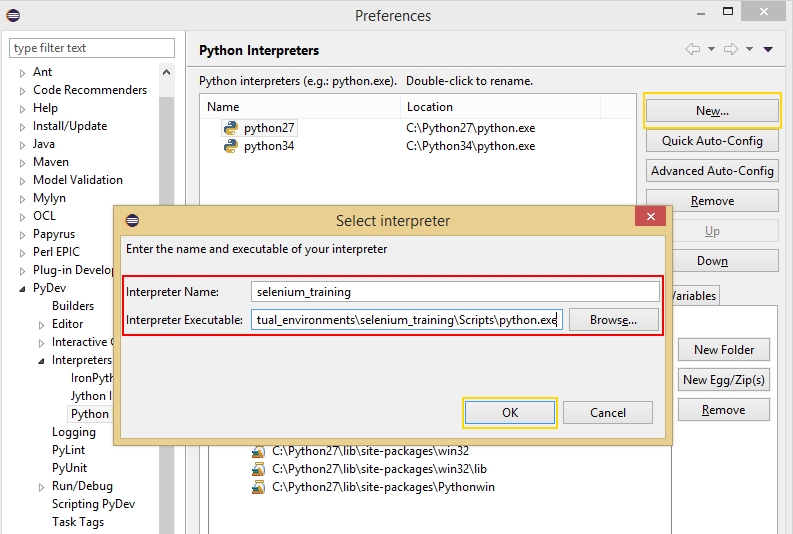
In the new window we should click the
'New' button, in the dialog you should enter a name for our
environment and select Python's executable from our environment, like
in the picture below:
After that, an additional window will
be shown with the list of folders that should be included into
Python's path:

Eclipse will process the new
interpreter for several seconds

And after that we may choose this
environment as the base for our project:

So, we created our environment and now
it is the time to install nosetests, py.test and Selenium. Before the
installation we should activate our virtual environment using
activate command. Command source activate should be
used in *nix based operation systems. After that we should deactivate
it using deactivate command
C:\Users\Mikhail\Documents\Development\virtual_environments\selenium_training\Scripts>activate
(selenium_training)
C:\Users\Mikhail\Documents\Development\virtual_environments\selenium_training\Scripts>pip
install nose
Collecting
nose
Downloading
nose-1.3.7-py2-none-any.whl (154kB)
100%
|################################| 155kB 435kB/s
Installing
collected packages: nose
Successfully
installed nose-1.3.7
(selenium_training)
C:\Users\Mikhail\Documents\Development\virtual_environments\selenium_training\Scripts>pip
install -U pytest
Collecting
pytest
Downloading
pytest-2.7.2-py2.py3-none-any.whl (127kB)
100%
|################################| 131kB 440kB/s
Collecting
py>=1.4.29 (from pytest)
Downloading
py-1.4.30-py2.py3-none-any.whl (81kB)
100%
|################################| 86kB 525kB/s
Collecting
colorama (from pytest)
Downloading
colorama-0.3.3.tar.gz
Building
wheels for collected packages: colorama
Running
setup.py bdist_wheel for colorama
Stored
in directory:
C:\Users\Mikhail\AppData\Local\pip\Cache\wheels\e3\24\8d\aec3db961cfbc8e939dc1843126548e7d479349f96659067e9
Successfully
built colorama
Installing
collected packages: py, colorama, pytest
Successfully
installed colorama-0.3.3 py-1.4.30 pytest-2.7.2
(selenium_training)
C:\Users\Mikhail\Documents\Development\virtual_environments\selenium_training\Scripts>pip
install selenium
Collecting
selenium
Downloading
selenium-2.47.1-py2-none-any.whl (3.0MB)
100%
|################################| 3.0MB 50kB/s
Installing
collected packages: selenium
Successfully
installed selenium-2.47.1
(selenium_training)
C:\Users\Mikhail\Documents\Development\virtual_environments\selenium_training>deactivate
C:\Users\Mikhail\Documents\Development\virtual_environments\selenium_training>
The pip install command supports
special requirements files. It is not a purpose of this article to
describe how to do that – more information about this capability
could be found here,
as well as about the format of the requirement file – here
Selenium has integrated support only
for FireFox. For other browsers we should download special
executables. We expect that our tests will work in both Google Chrome
and Mozilla FireFox. The special driver for Google Chrome is
available here,
the latest release is 2.19 (according to LATEST_RELEASE file). For
Windows OS we should download a zip archive. This archive contains
only one file chromedriver.exe. This file should be uploaded into
directory from PATH environment variable.
The main purpose of this article is to
demonstrate base usage of Selenium and several test frameworks on
Python. A more detailed description will be discovered as part of
several articles coming up next.
All the required modules and libraries
have been installed and it is the time to make sure that all works
fine.
Class for working with web-page
Both sites http://www.google.com
and http://www.yandex.com
have been used for test purposes of this article
I've prepared a simple class that has
the following functionality:
- Start a browser's instance
- Open a page and return page's title
- Quit from the browser
Start a browser's instance is:
def
start_browser(self,
broswer_type='Firefox'):
if
re.match("firefox",
broswer_type, re.I):
self.driver
= webdriver.Firefox()
elif
re.match("chrome",
broswer_type, re.I):
self.driver
= webdriver.Chrome()
else:
self.driver
= webdriver.Firefox()
We will support only two browsers
Mozilla Firefox and Google Chrome with default browser Mozilla
Firefox
Open a page and return page's title
is:
def
open_web_page(self,
url):
self.driver.get(url)
return
self.driver.title
An exit from the browser is covered by
two separate functions. Selenium allows a user to open several
windows in a browser. Due to this capability, Selenium has the quit()
function that closes all windows in a browser and stops Selenium
driver and the close() function that closes the current window
of the browser, if the current window is the last window than the
close() function works the same way as the quit() function.
So, in our scenario, quit from the browser is:
def
close_browser_window(self):
self.driver.close()
#
Additional sleep for 5 seconds to make sure
#
that browser window has been closed properly.
#
If we remove that timeout, then call of function start_browser
#
after close_browser_window may do nothing, since instance exists
#
but closing
sleep(3)
def
stop_browser(self):
#
we should check if any instance of driver exists in the system
if
self.number_of_opened_windows()
!= 0:
self.driver.quit()
Frameworks for writing and launching tests
Since a test may return both pass and failure results, each examples of the test framework usage will contain two types of scenarios:- Scenario(s) that returns pass result
- Scenario(s) that returns failure
Simple tests with unittest
This my article provides enough information to get down to unittest module. Here I prefer to concentrate mainly on the key points of implementation:Setup and teardown functions on class level are required to create a driver and start the browser instance, close all open windows and quit from browser respectively:
@classmethod
def
setUpClass(cls):
print
"Unittest
set-up class method"
cls.page.start_browser()
@classmethod
def
tearDownClass(cls):
print
"Unittest
tear-down class method"
cls.page.stop_browser()
Setup and teardown functions on method level are required to start the browser instance if it was closed due to the quit() function with the latest opened window of the browser and close current browser window respectively:
def
setUp(self):
print
"Unittest
set-up method"
if
self.page.number_of_opened_windows()
== 0:
print
"Start
new browser instance"
self.page.start_browser()
def
tearDown(self):
print
"Unittest
tear-down method"
self.page.close_browser_window()
Both correct and incorrect tests:
def
testCorrectCheckTitle(self):
actual_title =
self.page.open_web_page(yandex_url)
self.assertEqual(yandex_title,
actual_title, "Title
is incorrect. Expected '{}', Actual '{}'".format(yandex_title,
actual_title))
def
testIncorrectCheckTitle(self):
actual_title =
self.page.open_web_page(google_url)
self.assertEqual(yandex_title,
actual_title, "Title
is incorrect. Expected '{}', Actual '{}'".format(yandex_title,
actual_title))
Part of the output with failure and results:
======================================================================
FAIL:
testIncorrectCheckTitle (__main__.UnitTestExample)
----------------------------------------------------------------------
Traceback
(most recent call last):
File
"C:\Users\Mikhail\Documents\Development\sandbox_python\mera\selenium_training\unittest_example.py",
line 39, in testIncorrectCheckTitle
self.assertEqual(yandex_title,
actual_title, "Title is incorrect. Expected '{}', Actual
'{}'".format(yandex_title, actual_title))
AssertionError:
Title is incorrect. Expected 'Yandex', Actual 'Google'
----------------------------------------------------------------------
Ran
2 tests in 43.165s
FAILED (failures=1)
I've
highlighted the following information:
- Name of the failed test
- Total number of executed tests
- Amount of failed tests
- Assert message(s) for failed tests
Simple tests with nosetests
First of all, the documentation that is required to work with nose is available here. Pay your attention to this paragraph to understand the types of tests that could be launched by default within the nosetests framework: especially in this line: Any python source file, directory or package that matches the testMatch regular expression (by default: (?:^|[b_.-])[Tt]est) will be collected as a test (or source for collection of tests).We can launch the unittest case and compare the results. A certain part of the log was removed so as to save space – please find the full log here. Please note that the reviewed case was launched from command line interface with activated virtual environment
(selenium_training) C:\Users\Mikhail\Documents\Development\sandbox_python\mera\selenium_training>nosetests unittest_example.py
.F
======================================================================
FAIL: testIncorrectCheckTitle (mera.selenium_training.unittest_example.UnitTestExample)
----------------------------------------------------------------------
Traceback (most recent call last):
File "C:\Users\Mikhail\Documents\Development\sandbox_python\mera\selenium_training\unittest_example.py", line 39, in testIncorrectCheckTitle
self.assertEqual(yandex_title, actual_title, "Title is incorrect. Expected '{}', Actual '{}'".format(yandex_title, actual_title))
AssertionError: Title is incorrect. Expected 'Yandex', Actual 'Google'
-------------------- >> begin captured stdout << ---------------------
Unittest set-up method
Start new browser instance
--------------------- >> end captured stdout << ----------------------
-------------------- >> begin captured logging << --------------------
… Several lines were removed to save space …
--------------------- >> end captured logging << ---------------------
----------------------------------------------------------------------
Ran 2 tests in 44.355s
FAILED (failures=1)
(selenium_training) C:\Users\Mikhail\Documents\Development\sandbox_python\mera\selenium_training>
We may notice that the format of the output differs from the unitest output format. The value of verbosity parameter by default equals to 1. It is the reason why we may notice .F at the beginning of the log. As we know from unittest framework . (dot) means that the test has been completed successfully and F (capital f) means failed result.
Lets talk about the nosetests itself. What kind of benefits we may achieve using this framework? The main advantage of nosetests usage is an extended version of fixtures. The nosetests framework has the following fixtures (depends on fixture's level):
- Test
package: Nosetests provides the capability of grouping tests in
packages. So, it allows package level setup and teardown function
that should be declared in __init__.py module of the package. List
of names for setup and teardown functions on package level is:
- Setup
functions: setup, setup_package, setUp, setUpPackage
- Teardown
functions: teardown, teardown_package, tearDown, tearDownPackage
- Setup
functions: setup, setup_package, setUp, setUpPackage
- Test
module: It is a module with name that satisfy to testMatch regular
expression. List of names for setup and teardown functions on module
level is:
- Setup
functions: setup, setup_module, setUp, setUpModule
- Teardown
functions: teardown, teardown_module, tearDown, tearDownModule
- Setup
functions: setup, setup_module, setUp, setUpModule
- Test
classes: it could be a class in a module that matches testMatch
regular expression or is a subclass of unittest.TestCase. At the
level of classes both setup and teardown fixtures could have
following names:
- Setup
functions: setup_class, setupClass, setUpClass, setupAll, setUpAll
- Teardown
functions: teardown_class, teardownClass, tearDownClass,
teardownAll, tearDownAll
- Like
unittest.TestCase subclasses, other test classes can define setUp
and tearDown methods that will be run before and after each test
method.
- Setup
functions: setup_class, setupClass, setUpClass, setupAll, setUpAll
- Test
functions: set of functions in a test module that matches testMatch
criteria. Major notice here is that test functions may define setup
and teardown attributes, which will be run before and after the test
function, respectively. For that purpose special decorator
with_setup
exists. This
decorator is useful only for test functions and should not be used
for test methods in unittest.TestCase subclasses or other test
classes
In this case we should use nose testing tools that are described here
Lets look at the simple implementation of tests according to the information above. As part of our tutorial we will look at test classes and test functions:
Our class has following structure:
class
TestNoseTestExample():
page = HomePage()
#
This method will be called before execution of tests from the class
@classmethod
def
setup_class(cls):
print
"NoseTests
set-up class method"
cls.page.start_browser()
#
This method will be called before execution of each test
def
setUp(self):
print
"NoseTests
set-up method"
if
self.page.number_of_opened_windows()
== 0:
print
"Start
new browser instance"
self.page.start_browser()
#
This method will be called after execution of each test
def
tearDown(self):
print
"NoseTests
tear-down method"
self.page.close_browser_window()
#
This method will be called after execution of tests from the class
@classmethod
def
teardown_class(cls):
print
"NoseTests
tear-down class method"
cls.page.stop_browser()
def
testCorrectCheckTitleYandex(self):
expected_title =
yandex_title
actual_title =
self.page.open_web_page(yandex_url)
eq_(expected_title,
actual_title, "Title
is incorrect. Expected '{}', Actual '{}'".format(expected_title,
actual_title))
def
testIncorrectCheckTitleYandex(self):
expected_title =
google_title
actual_title =
self.page.open_web_page(yandex_url)
eq_(expected_title,
actual_title, "Title
is incorrect. Expected '{}', Actual '{}'".format(expected_title,
actual_title))
def
testCorrectCheckTitleGoogle(self):
expected_title =
google_title
actual_title =
self.page.open_web_page(google_url)
eq_(expected_title,
actual_title, "Title
is incorrect. Expected '{}', Actual '{}'".format(expected_title,
actual_title))
def
testIncorrectCheckTitleGoogle(self):
expected_title =
yandex_title
actual_title =
self.page.open_web_page(google_url)
eq_(expected_title,
actual_title, "Title
is incorrect. Expected '{}', Actual '{}'".format(expected_title,
actual_title))
The differences between this implementation and the implementation using unittest.TestCase framework:
- Our class is not a subclass of unittest.TestCase. The nosetests supports such capability.
- Both
setup_class
and teardown_class
methods is used to support setup and teardown operations on the
class level
- Special
functions eq_
from nosetest framework has the same role like assert of equal
statement
(selenium_training) C:\Users\Mikhail\Documents\Development\sandbox_python\mera\selenium_training>nosetests nosetest_example_class.py
..FF
======================================================================
FAIL:
mera.selenium_training.nosetest_example_class.TestNoseTestExample.testIncorrectCheckTitleGoogle
----------------------------------------------------------------------
Traceback
(most recent call last):
… Several
lines were removed to save space …
----------------------------------------------------------------------
Ran
4 tests in 129.587s
FAILED
(failures=2)
(selenium_training)
C:\Users\Mikhail\Documents\Development\sandbox_python\mera\selenium_training>
Let's demonstrate the usage of decorator @with_setup with functions. This capability is useful when we would like to add some flexibility to our tests. For example, we have several groups of functions and each group has its own setup and teardown. It can be solved by including each group in a separate class. But for list of functions we will achieve the same goal using the @with_setup decorator. For example, in our case let's set the site's URL in set-up level, not inside the test. I have two different URLs, so my setup and teardown methods have the following format:
#
This method will be called before execution of special tests
def
setup_yandex():
global
url, page
print
"NoseTests
set-up method for Yandex"
url = yandex_url
if
page.number_of_opened_windows() == 0:
print
"Start
new browser instance"
page.start_browser()
#
This method will be called before execution of special tests
def
setup_google():
global
url, page
print
"NoseTests
set-up method for Google"
url = google_url
if
page.number_of_opened_windows() == 0:
print
"Start
new browser instance"
page.start_browser()
#
This method will be called after execution of each test
def
teardown_any():
global
page
print
"NoseTests
tear-down method"
page.close_browser_window()
Tests has the following format (on example with one test):
@with_setup(setup=setup_google,
teardown=teardown_any)
def
testCorrectCheckTitleGoogle():
global
url, page
expected_title =
google_title
actual_title =
page.open_web_page(url)
eq_(expected_title,
actual_title, "Title
is incorrect. Expected '{}', Actual '{}'".format(expected_title,
actual_title))
Execution workflow starts with setup_module function, after that (for the test above) the setup_google function will be executed, after test execution the teardown_any function will be executed. The teardown_module function will be executed in the end, when the execution of the whole list of tests is finished.
The source code for the case with classes is available here, with functions – here.
The console output from the case with classes is available here, with functions – here.
The additional feature of nosetests is test generators support that described here. Pay your attention to the following point in the documentation:
- By
default, the test name output for a generated test in verbose mode
will be the name of the generator function or method, followed by
the args passed to the yielded callable.
- If
you want to show a different test name, set the
description
- Setup
and teardown functions may be used with test generators. However,
please note that setup and teardown attributes attached to the
generator
function
will
execute only once. To execute
fixtures for each yielded test,
attach the setup and teardown attributes to the function that is
yielded, or yield a callable object instance with setup and teardown
attributes.
- For
generator methods, the setUp and tearDown methods of the class (if
any) will be run before and after each generated test case. The
setUp and tearDown methods do
not run
before the generator method itself, as this would cause setUp to run
twice before the first test without an intervening tearDown.
- Please
note that method generators are
not supported
in unittest.TestCase
subclasses.
#
This method will be called before execution of all tests
def
setup_module():
print
"NoseTests
set-up module method for generators"
page.start_browser()
#
This method will be called before execution of special tests
def
setup_any():
global
page
print
"NoseTests
set-up method for generators"
if
page.number_of_opened_windows() == 0:
print
"Start
new browser instance"
page.start_browser()
#
This method will be called after execution of each test
def
teardown_any():
global
page
print
"NoseTests
tear-down method for generators"
page.close_browser_window()
#
This method will be called after execution of tests from the class
def
teardown_module():
global
page
print
"NoseTests
tear-down module method for generators"
page.stop_browser()
@with_setup(setup=setup_any,
teardown=teardown_any)
def
testCheckTitleFunction():
for
test_url, test_title in
[[t_url, t_title] for
t_url in
[yandex_url, google_url] for
t_title in
[yandex_title, google_title]]:
yield
check_title, test_url, test_title
#
Function that will be used in generator
def
check_title(url,
expected_title):
global
page
actual_title =
page.open_web_page(url)
eq_(expected_title,
actual_title, "Title
is incorrect. Expected '{}', Actual '{}'".format(expected_title,
actual_title))
#
Class that will be used in generator (as callable
object)
class
CheckTitle():
def
__call__(self,
url, expected_title):
self.description
= "Checking
url:
'{}' with title '{}'".format(url,
expected_title)
actual_title =
page.open_web_page(url)
eq_(expected_title,
actual_title, "Title
is incorrect. Expected '{}', Actual '{}'".format(expected_title,
actual_title))
@with_setup(setup=setup_any,
teardown=teardown_any)
def
testCheckTitleClass():
for
test_url, test_title in
[[t_url, t_title] for
t_url in
[yandex_url, google_url] for
t_title in
[yandex_title, google_title]]:
yield
CheckTitle(), test_url, test_title
This
case demonstrates the first three points from the description of the
genarators above. This information is highlighted below. Please note
that according to our implementation and the rule from the list
above, first four tests (.FF.)
uses an instance of the browser and second four tests (.FF.)
uses another one
(selenium_training)
C:\Users\Mikhail\Documents\Development\sandbox_python\mera\selenium_training>nosetests
nosetest_example_generators.py
.FF..FF.
======================================================================
FAIL:
mera.selenium_training.nosetest_example_generators.testCheckTitleFunction('https://www.yandex.com/',
'Google')
…
Several
lines were removed to save space …
======================================================================
FAIL:
mera.selenium_training.nosetest_example_generators.testCheckTitleFunction('http://www.google.com',
'Yandex')
…
Several
lines were removed to save space …
======================================================================
FAIL:
Checking url: 'https://www.yandex.com/' with title 'Google'
…
Several
lines were removed to save space …
======================================================================
FAIL:
Checking url: 'http://www.google.com' with title 'Yandex'
…
Several
lines were removed to save space …
Ran
8 tests in 60.867s
FAILED
(failures=4)
(selenium_training)
C:\Users\Mikhail\Documents\Development\sandbox_python\mera\selenium_training>
Source code of the case with generators
is located here.
Output from the execution of this code
is located here.
My latest comment about nosetests is
about the execution of the tests from Python scripts. We should use
the following construction to perform the execution of all tests in a
module:
if
__name__ == "__main__":
nose.runmodule()
Simple tests with py.test
The py.test is the
framework with huge capabilities in
terms of writing tests and test execution.
I recommend that you review this framework in the on-linedocumentation but concentrate mainly on the following:
- Using py.test with functions and classes
- Parametrized test functions
- Marking test functions with attributes
- Skip and xfail: dealing with tests that can not succeed
- Continuously re-run failing tests
How
does pytest relate to nose and unittest?
pytest and nose share basic philosophy when it comes
to running and writing Python tests. In fact, you can run many tests
written for nose with pytest. nose was originally created as a clone
of pytest when pytest was in the 0.8 release cycle. Note that
starting with pytest-2.0 support for running unittest test suites is
majorly improved.
py.test framework, as well as nosetests framework, has its own test discoveryprocess. Lets repeat it here:
- collection starts from the initial command line arguments which may be directories, filenames or test ids.
- recurse
into directories, unless they match
norecursedirs pattern
- test_*.py
or *_test.py
files, imported by their test package name
- Test
prefixed test classes (without an __init__
method).
Source code is here and output is here
- test_
prefixed test functions or methods are test items. Source code is
here and output is here
Highlights
for the py.test framework:
- The
py.test framework supports launching of tests that were developed
with nosetest framework. There are several limitations to this case
– you can find the details here. If
we launch our case with nosetests functionality with functions, than
output will be like that:(selenium_training)
C:\Users\Mikhail\Documents\Development\sandbox_python\mera\selenium_training>py.test.exe
-s -v nosetest_example_functions.py
============================= test session starts =============================
platform win32 -- Python 2.7.8 -- py-1.4.30 -- pytest-2.7.2 – c:\users\mikhail\documents\development\virtual_environments\selenium_training\scripts\python.exe
rootdir: C:\Users\Mikhail\Documents\Development\sandbox_python\mera\selenium_training, inifile:collected 4 items
nosetest_example_functions.py::testCorrectCheckTitleYandex NoseTests set-up module method
NoseTests set-up method for YandexPASSED
NoseTests tear-down method
nosetest_example_functions.py::testIncorrectCheckTitleYandex NoseTests set-up method for Yandex
Start new browser instanceFAILED
NoseTests tear-down method … Several lines has removed to save space … ================================== FAILURES ===================================
________________________ testIncorrectCheckTitleYandex ________________________
@with_setup(setup=setup_yandex, teardown=teardown_any)
def testIncorrectCheckTitleYandex():
global url, page
expected_title = google_title
actual_title = page.open_web_page(url)
> eq_(expected_title, actual_title, "Title is incorrect. Expected '{}', Actual '{}'".format(expected_title, actual_title))
nosetest_example_functions.py:68:
_ _ _ _ _ _ _ _ _ _ _ _ _ _ _ _ _ _ _ _ _ _ _ _ _ _ _ _ _ _ _ _ _ _ _ _ _ _ _ _
a = 'Google', b = 'Yandex'
msg = "Title is incorrect. Expected 'Google', Actual 'Yandex'"
def eq_(a, b, msg=None):
"""Shorthand for 'assert a == b, "%r != %r" % (a, b)
"""
if not a == b:
> raise AssertionError(msg or "%r != %r" % (a, b))E AssertionError: Title is incorrect. Expected 'Google', Actual 'Yandex'
..\..\..\virtual_environments\selenium_training\lib\site-packages\nose\tools\trivial.py:29: AssertionError
… Several lines has removed to save space …
==================== 2 failed, 2 passed in 124.12 seconds =====================(selenium_training) C:\Users\Mikhail\Documents\Development\sandbox_python\mera\selenium_training>
Full output is available here
- The
py.test framework supports launching of tests that was developed
using unittest.TestCase functionality. More information here.
If
we launch our unittest.TestCase example, than the output will look
like that:(selenium_training)
C:\Users\Mikhail\Documents\Development\sandbox_python\mera\selenium_training>py.test.exe
-v -s unittest_example.py
============================= test session starts =============================
platform win32 -- Python 2.7.8 -- py-1.4.30 -- pytest-2.7.2 – c:\users\mikhail\documents\development\virtual_environments\selenium_training\scripts\python.exe
rootdir: C:\Users\Mikhail\Documents\Development\sandbox_python\mera\selenium_training, inifile:collected 2 items
unittest_example.py::UnitTestExample::testCorrectCheckTitle Unittest set-up class method
Unittest set-up method
Unittest tear-down methodPASSED
unittest_example.py::UnitTestExample::testIncorrectCheckTitle Unittest set-up method
Start new browser instance
Unittest tear-down methodFAILED
Unittest tear-down class method
================================== FAILURES ===================================
___________________ UnitTestExample.testIncorrectCheckTitle ___________________
self = <mera.selenium_training.unittest_example.UnitTestExample testMethod=testIncorrectCheckTitle>
def testIncorrectCheckTitle(self):
actual_title = self.page.open_web_page(google_url)
> self.assertEqual(yandex_title, actual_title, "Title is incorrect. Expected '{}', Actual '{}'".format(yandex_title, actual_title))E AssertionError: Title is incorrect. Expected 'Yandex', Actual 'Google'
unittest_example.py:39: AssertionError
===================== 1 failed, 1 passed in 41.72 seconds =====================(selenium_training) C:\Users\Mikhail\Documents\Development\sandbox_python\mera\selenium_training>
Full output is available here.
- Several facts about assertion in tests:
- Definition
of the assert statement is: assert
expression
or assert
expression custom_message
- If
the custom_message
provided, then no assertion introspection takes places at all and
the custom_message
will be shown in the traceback.
- Raising
of exception can be checked with pytest.raises
expression. More information about usage is here
- The
py.test framework provides smart comparison for a number of cases.
Detailed information is here
- User
custom assertion could be add by implementation of the
pytest_assertrepr_compare
hook. As well as in previous cases, more details here
- Definition
of the assert statement is: assert
expression
or assert
expression custom_message
- Fixtures. As I mentioned above, fixtures in the py.test increase flexibility of tests' configuration significantly. In the documentation we may notice the following:
- fixtures have explicit names and are activated by declaring their use form test functions, modules, classes or whole projects.
- Fixtures
are implemented in a modular manner, as each fixture name triggers
a fixture
function
which can itself be fixtures.
- Fixture management scales from simple unit to complex functional testing, allowing to parametrize fixtures and tests according to configuration and component options, or to re-use fixtures across class, module or whole test session scopes.
The
number of fixture's capabilities is huge, I would like to concantrate
only on top of the iceberg.
- Declaration
of fixture
can be done using a special decorator: @pytest.fixture
- Fixtures
can be used in different scopes of a source code or a project. You
should define the scope using the parameter with the name scope,
default value is function.
In my examples I'm using the scope module
too. You may read about it here
- Fixtures
are executed before the test method (like setup function). We could
add a special finalizer method in fixture definition to make sure
that the functionality of this method will be executed in the end
(like teardown function):
# This method will be called before execution of all tests@pytest.fixture(scope="module")def setup_module(request):
print "Py.test set-up module method"
page.start_browser()
# This method will be called after execution of all tests def fin():
global page
print "Py.test tear-down module method"
page.stop_browser()
request.addfinalizer(fin)
Fixtures without the finalizer method will not execute anything after test execution.
This is described here
- Fixtures
can be parametrized. This capability is described here.
It allows to cover a large number of configurations with a small
number of tests. Please look at my example here. This process of
grouping fixtures is described here.
- The
py.test supports the parameters processing that needs to be skipped
or produce the expected fail results – please read the
description in official documentation.
I've added my example that demonstrates the usage of xfail
capability here. Output from the launch is here. This functionality
is also supported in unittest.TestCase (Python 2.X or Python 3.X)
- The
py.test supports both capabilities: parametrizing of fixtures and parametrizing of functions that is described here. You can find the the example and the output by following the links
for fixtures source/output and functions source/output.
I would like to provide several snippets of both source code with fixtures and source code with functions here:yandex_title = "Yandex"yandex_url = "https://www.yandex.com/"google_title = "Google"google_url = "http://www.google.com"
For functions:@pytest.mark.parametrize("test_url,test_title", [(yandex_url, yandex_title),
(yandex_url, google_title),
(google_url, google_title),
pytest.mark.xfail((google_url, yandex_title))])@pytest.mark.usefixtures("setup_module", "setup_function")def test_CheckTitle(test_url,test_title):
global page
actual_title = page.open_web_page(test_url)
assert test_title == actual_title, "Title is incorrect. Expected '{}', Actual '{}'".format(test_title, actual_title)
Fixtures. The additional function id_fixture_function and the fixture's parameter ids are used for several purposes. The first purpose is to provide more description in the output (example of the output is here), and the second purpose is to filter the list of executed tests by special substring. If the test id contains this substring then the test will be executed (example of the output is here):# This function returns id for fixture valuedef id_fixture_function(fixture_value): return "Url: '{}'. Title: '{}'".format(*fixture_value)
@pytest.fixture(scope="function", params = [[t_url, t_title] for t_url in [yandex_url, google_url] for t_title in [yandex_title, google_title]],
ids = id_fixture_function)def setup(request):
global url, title, page
print "Py.test set-up method" url = request.param[0]
title = request.param[1]
if page.number_of_opened_windows() == 0:
print "Start new browser instance"
page.start_browser()
# This method will be called after execution of each test def fin():
global page
print "Py.test tear-down method" page.close_browser_window()
request.addfinalizer(fin)
If we need to execute the py.test inside Python script with tests, we should keep in mind that script's name must have one of the following formats test_*.py or *_test.py. Command below should be used for launching the py.test framework with this script. Parameters of the main function is a list of command line arguments that will be used if tests from the module are launched in command line:
pytest.main(args=['-v',
'-s'])